This post explains how to work your way through the “Availability and Prices” extranet screen, and how to fill in each of the fields. Remember that you can always write us at property@only-apartments.com if you have any questions.
How does the “Calendar” tab work?
This page will give you a full overview of your property’s calendar. Use these buttons to choose between the two layouts:
If you click on the first button, the months will be arranged horizontally, and you’ll be able to choose whether you want to see the full calendar (showing availability and prices), or whether you’d rather just see availability, or just pricing:
If you choose the second option, you’ll see the months arranged in boxes, and you’ll be able to choose whether to display availability or prices via this button:
When you select any dates on the calendar, you’ll be able to:
- Mark those dates as booked (by clicking on “Create Booking”) if the apartment has been booked through a different site. Any bookings made via Only-apartments will show up on the calendar directly, without having to mark the dates off.
- Block off those dates (click on “Close Sales”)
- Link a season to those dates (click on “Apply Season”). You’ll have the option to either select a previously created season from the “Seasons” tab, or create a new one.
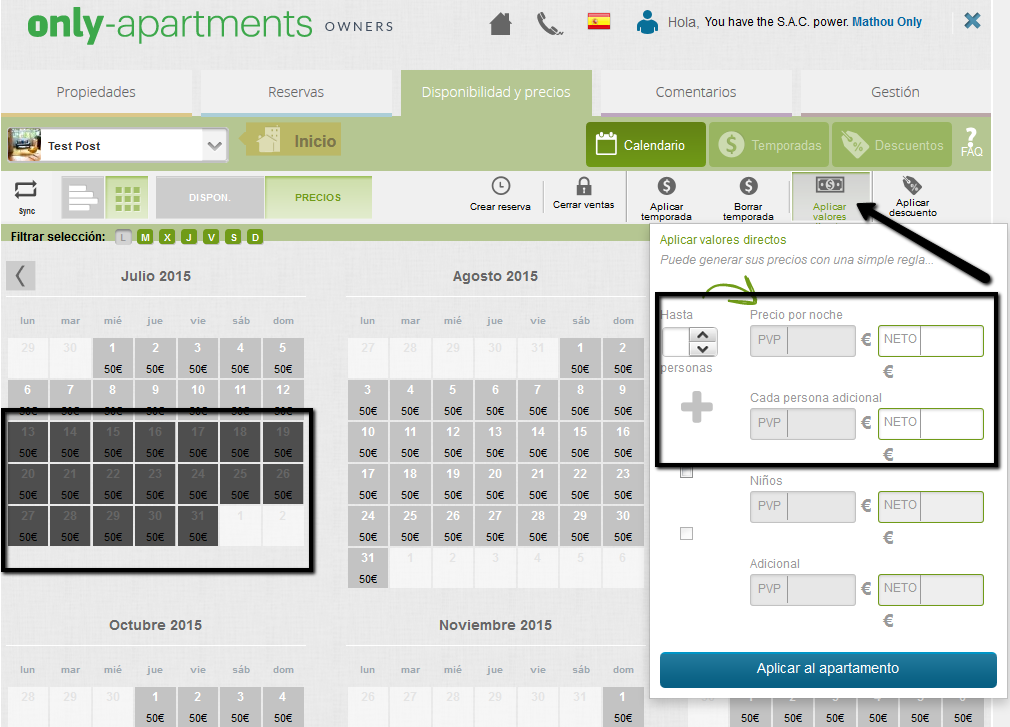
- Apply direct values unique to those dates (click on “Apply Direct Values”).
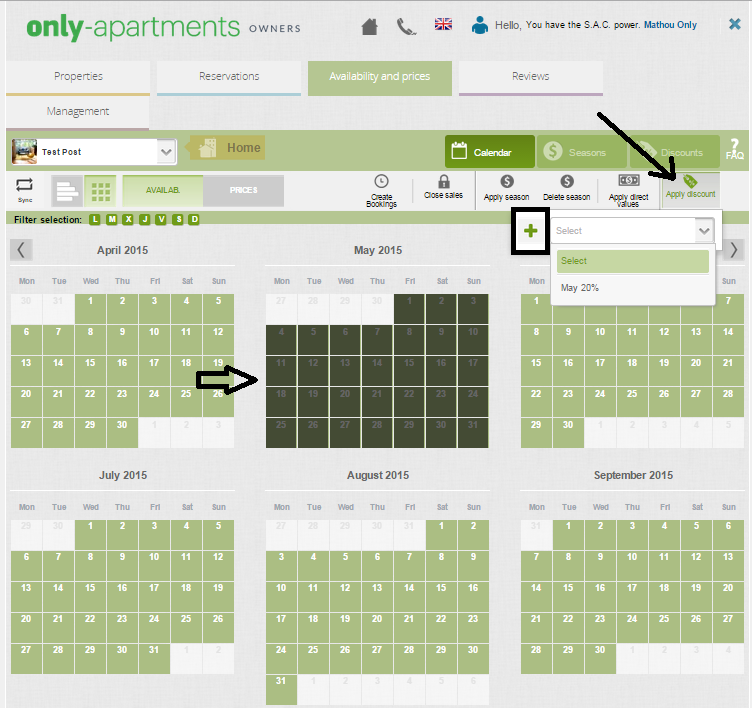
- Apply a discount to those dates (click on “Apply Discount”). You’ll have the option to either select a previously created discount from the “Discounts” tab, or create a new one.
After you’ve blocked off the desired dates and updated your calendar, click on the “Update Calendar” button. This will make our algorithm push your property higher up on the search results (there are many other contributing factors such as the quality and number of pictures, not overbooking, or updating your calendar, among others).
How can I synchronize the calendar with external calendars?
Click on the synchronize button on the left hand side of the screen.
You can update your Only-apartments calendar to include any dates you’ve blocked off on your Google Calendar. To do so, just click on “Link” and then, enter the corresponding URL. Make sure that:
- Your Google Calendar is set to public
- You’ve mark the dates you want to block off as “not available”
- The URL entered is in iCal format (no XML or HTML)
You can also synch your Only-apartments’ booking calendar with Kigo’s calendar, and vice versa. Just click on “Link” and enter KIGO’s apartment code. Keep in mind that the apartment must be listed on both sites in order for this to work!
Once both calendars are linked, you can click on “Synchronize Now” as often as you wish to synchronize the calendars.
How can I create seasons?
You can create seasons from the calendar itself, by selecting your desired dates. Alternately, you can also go to the “Seasons” tab, create as many seasons as you like, and then return to the calendar to apply each of those seasons to whichever dates you wish.
If you have more than one property, you can import seasons from one property to another on the “Seasons” tab, or you can also create new seasons by clicking on “New season”. Give each season a name and color on the top left side of the screen:
You can edit your season by creating a variation on your base rate (slide the ball across the horizontal bar):
Or also directly create new prices by clicking on “Absolute Prices”. Once there, create your prices and click on “Next” to proceed to the next screen, or click on “Advanced” if you want to create specific prices for children and/or extra beds.
On the next screen, you’ll have to specify the type of stay, as well as the minimum duration of the stay, and the minimum notice period for that particular season. You can also click on the Advanced option (by clicking on “Edit”) to stipulate the check-in and check-out dates:
When you are done editing, click on “Save and Close” and the new season will appear on your list of seasons. To apply it to any dates in particular, just go to the calendar, select those dates, and apply the season.
How do I create discounts?
You can create discounts from the calendar itself, by selecting your desired dates. Alternately, you can also go to the “Discounts” tab, create as many discounts as you like, and then return to the calendar to apply each of those discounts to whichever dates you wish.
Go to the “Discounts” tab and click on “New discount”. Give it a name on the top left side of the screen:
Choose one of the 6 types of discounts available and apply any value you wish. Click on “Save” and the new discount will appear on your list of existing discounts. To apply a “Simple Discount” to any dates in particular, go to the calendar, select those dates, and apply the discount. Any other types of discounts (Last Minute, Advance Purchase, Discount per Week, Discount per Month, Extended Stay) will be applied automatically whenever applicable, and at the time of booking.

 English
 Français
 Deutsch
 Italiano
 Español

